Outdoor Learning: Nature Mandalas
By MARISSA DESPINS Updated April 10, 2024
As many of you already know, Outdoor Learning is a passion of mine. I am currently teaching a grade 2/3 group in a Place Based Education class. Because of this, we spend a good portion of our learning time in the great outdoors. We recently completed this fun nature mandala activity, and I am excited to share it with you today.
Download the complete nature mandala activity, with detailed instructions and student templates, by clicking on the image or button below.
What is a Nature Mandala and how can I incorporate them into my Outdoor Learning time?
To begin our lesson, we talked about what mandalas are. A lot of the kids were, surprisingly, already familiar with this art form. A few of them had even made mandalas before. Because of this, engagement was high before the lesson even began.
Basically, a mandala is a circular structure with radial symmetry, which means that the design radiates out symmetrically from the center. Mandalas can naturally be found in nature. You can find mandalas in tree rings, snowflakes, spiderwebs, flowers, sea shells, succulents, and more. As a result of this, students were able to provide a lot of different mandala examples that they had previously discovered when exploring and playing in the great outdoors.
For additional information on mandalas and another fun mandala activity, check out this fun art project for back to school!
Nature Mandalas – Step by Step Instructions
Read on for step by step instructions to help you complete this fun outdoor learning activity with your students!
Mandala Examples
After a quick lesson on symmetry, I spent time sharing examples of nature mandala art pieces with my students. Afterwards, we spent class time discussing what we noticed and wondered about these mandalas. The students were immediately drawn in to the fun designs and bright colors used in these natural works of art. Because of this, they were excited to start creating their own.
Mandala Creation
Thankfully, the weather held out for us, making it a great day to head outside.
To begin, we spent some time talking about our outdoor space, and some of the materials that we might discover outside that we could include in our designs. Then, we spent some time sketching a few designs, and sharing them with our partners. After, I gave each student a bowl. We then went out to the playground to see what natural materials we could find to add to our designs.
Thankfully, our outdoor space proved to be bountiful. As a result, after a few quick trips spent gathering materials around the field, the kids had more than enough materials to create their designs.
Putting the pieces together
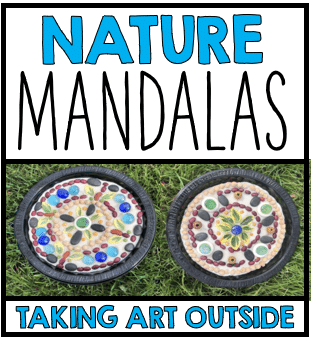
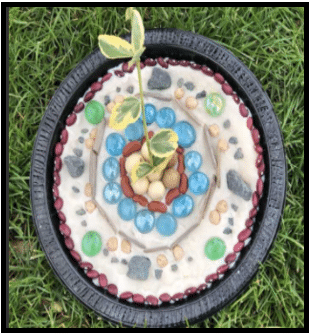
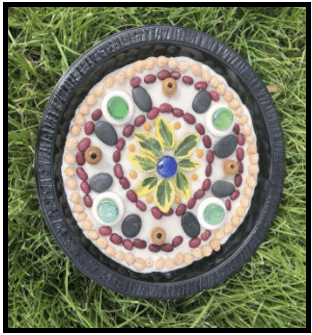
Because I wanted the students to be able to take their art pieces home, I gave each student a plastic plate and a blob of salt dough. Then, we rolled the dough into a circle and squashed it onto the plate. This made a great surface to stick our designs to.
After gathering materials, we sat down on the field and began creating our mandalas. I brought some loose parts out to use in our designs as well. Due to some leftovers from a previous art project, I had an abundance of glass beads leftover that the kids were able to use. Also, I had some old dried beans in the cupboard that were the perfect size for the mandalas. As a result, some students chose to add some of these materials to their designs. However, others chose to keep them “all natural”.
In the end, I think that both types of mandalas looked fantastic. Personally, I am a sucker for some sparkle. I really like the way the gems gave their mandalas a little pop of color. Because of this, I highly recommend bringing out some extra materials to add to the mandalas to give students some choice. Due to the choices provided, we ended up with wonderful array of different mandala designs.
Transporting the Mandalas home
Afterwards, we packed them up and brought them home to share with our parents. Because the natural items were stuck in the salt dough, the final designs were easy to transport. I am not sure how they would hold up if dropped or dumped in a backpack though. Thankfully my little learners were very careful with their mandalas. As a result, they seemed to make it home just fine.
Once completed, I was really pleased with how these turned out. Engagement was definitely high, and the kids loved the final products. I am already thinking of other ways to extend this activity next time. The kids really enjoyed making mandalas, and I am actively looking for ways to incorporate more of these fun designs into our outdoor learning time.
Planning on trying this outdoor learning activity with your own class? I would love to hear how your mandalas turn out! Please leave me a comment below – I look forward to learning alongside you.
For more fun outdoor activities, check out our posts on playground polygons and symmetry stick bugs!
Looking to find out more about this Outdoor Learning project?
You can find full details about this activity by clicking on the image below!
Looking for more Outdoor Learning ideas?
Be sure to check out the “Outdoor Learning” section in my TPT store by clicking on the image below.
Want to check out some of my previous outdoor learning posts?
Click on the link below to go directly to some of my previous posts all about Outdoor Learning.
Interested in signing up for my email list?
If you are interested in signing up for my email list, you can do so by clicking on the link below for free resources, teaching tips, and exclusive deals. Signing up will also give you immediate access to some of my best selling Interactive Notebook resources – foldables, graphic organizers, and other engaging activities.